
 Pin
Pin
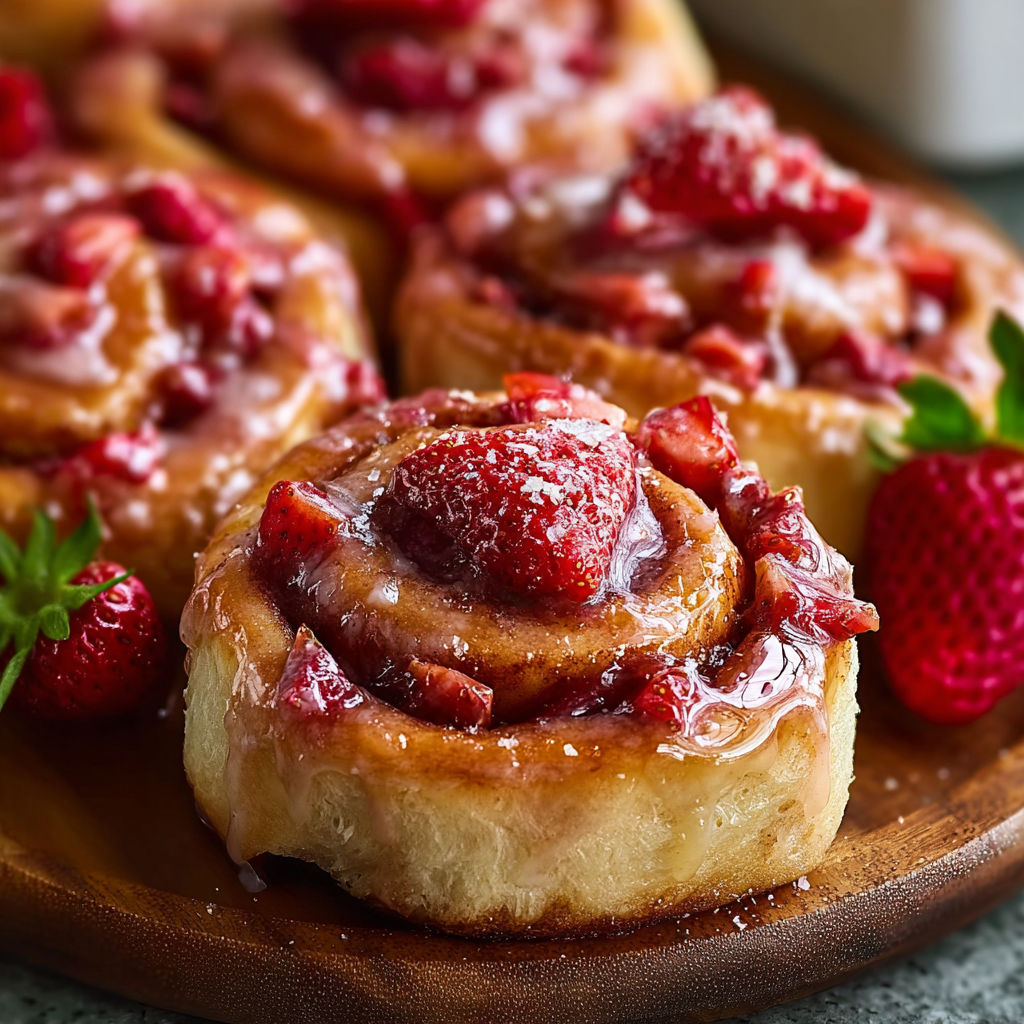
These strawberry cinnamon rolls have transformed every brunch gathering at my home into something truly memorable. The combination of pillowy soft dough swirled with fresh strawberry filling and topped with tangy cream cheese glaze creates a stunning centerpiece that tastes even better than it looks. I developed this recipe after years of making traditional cinnamon rolls, wanting something that would celebrate spring and summer flavors while keeping that comforting cinnamon roll texture everyone loves.
I originally created these for my daughter's birthday brunch three years ago, and now they've become our family's tradition for every celebration morning. The beautiful pink swirls never fail to get gasps when I bring them to the table, and guests always ask for the recipe before they even take their first bite.
Gather Your Ingredients
- Milk: Warmed to about 110 degrees Fahrenheit activates the yeast properly and creates tender dough.
- Granulated sugar (for dough): Feeds the yeast and adds subtle sweetness.
- Instant yeast: Works quickly and can be mixed directly into dry ingredients.
- Butter (for dough): Melted and slightly cooled, adds richness and keeps rolls tender.
- Eggs plus one extra yolk: Provide structure and create a golden color while adding richness.
- Bread flour: Higher protein flour develops gluten for a chewy texture and helps rolls hold their shape.
- Salt: Enhances all the flavors and balances sweetness.
- Strawberries: Fresh or frozen both work wonderfully for the filling.
- Granulated sugar (for filling): Draws out strawberry juices and creates a jammy consistency.
- Lemon juice: Brightens strawberry flavor and balances sweetness.
- Cornstarch: Thickens the filling, keeping it inside the rolls during baking.
- Cinnamon: Adds warmth without overpowering the strawberry flavor.
- Cream cheese: Softened to room temperature for smooth glaze.
- Butter (for glaze): Softened, not melted, for creamy consistency.
- Powdered sugar: Sweetens and thickens the glaze.
- Reserved strawberry filling: Adds color and intensifies strawberry flavor in the glaze.
- Milk or cream (for glaze): Thins the glaze to perfect drizzling consistency.
How to Make It
- Prepare the Strawberry Filling:
- Combine strawberries with granulated sugar, lemon juice, cornstarch, and cinnamon in a medium saucepan. Place over medium heat and stir frequently as the mixture begins to bubble. The strawberries will release their juices within about 3 to 4 minutes and the mixture will become fragrant. Continue cooking for 8 to 10 minutes total, stirring often and gently mashing the strawberries with the back of your spoon to break them down into a chunky jam consistency. The mixture should thicken noticeably and coat the back of your spoon. Remove from heat and let cool completely to room temperature, which takes about 30 minutes. Reserve 2 tablespoons of this filling in a small bowl for the glaze later.
- Make the Dough:
- Warm the milk in the microwave or on the stovetop until it reaches between 105 and 115 degrees Fahrenheit, which should feel warm but not hot when you test it with your finger. Pour the warmed milk into the bowl of your stand mixer fitted with the dough hook attachment. Add the granulated sugar and instant yeast, giving it a quick stir just to combine. Let this mixture sit for about 5 minutes until it becomes slightly foamy on top, which tells you the yeast is active and alive. Add the melted butter, whole eggs, and egg yolk to the bowl. Mix on low speed for about 30 seconds until everything combines into a shaggy mixture. Add the bread flour and salt all at once.
- Knead the Dough:
- Turn the mixer to medium low speed and let the dough hook knead the mixture for 7 to 9 minutes. The dough will transform from shaggy and rough to smooth and elastic. It should pull away from the sides of the bowl but still stick slightly to the bottom. Touch the dough with your finger and it should feel soft, smooth, and slightly tacky but not sticky. If the dough seems too wet and sticky after 5 minutes of kneading, add flour one tablespoon at a time. If it seems too dry and won't come together, add milk one teaspoon at a time. The dough is ready when you can stretch a small piece thin enough to see light through it without it tearing, which bakers call the windowpane test.
- First Rise:
- Lightly grease a large bowl with butter or cooking spray. Shape the dough into a smooth ball by pulling the edges underneath and place it seam side down in the greased bowl. Cover the bowl tightly with plastic wrap or a damp kitchen towel. Place it in a warm spot in your kitchen away from drafts. Good spots include inside your turned off oven with the light on, near a sunny window, or on top of your refrigerator. Let the dough rise for 60 to 90 minutes until it doubles in size. You'll know it's ready when you press two fingers into the dough and the indentation remains instead of bouncing back.
- Roll Out the Dough:
- Once risen, punch down the dough with your fist to release the air bubbles. Turn it out onto a lightly floured work surface. Use a rolling pin to roll the dough into a large rectangle measuring approximately 16 by 12 inches. Try to keep the edges as straight as possible and aim for even thickness throughout, which ensures the rolls bake evenly. The dough should be about 1/4 inch thick. If the dough keeps shrinking back as you roll, let it rest for 5 minutes to allow the gluten to relax, then continue rolling.
- Fill and Roll:
- Spread the cooled strawberry filling evenly over the entire surface of the dough rectangle, leaving a 1/2 inch border along one of the long edges. Use an offset spatula or the back of a spoon to spread it in an even layer from edge to edge. Starting from the long edge opposite the bare border, begin rolling the dough tightly toward you. Keep the roll tight and even as you work your way across, using your fingers to keep the filling from squeezing out the sides. When you reach the end, pinch the bare edge of dough firmly against the roll to seal it closed. Position the roll seam side down.
- Cut the Rolls:
- Use a piece of unflavored dental floss or a very sharp serrated knife to cut the log into 12 equal pieces. If using dental floss, slide it under the log, cross the ends over the top, and pull to slice through cleanly without squishing the roll. If using a knife, use a gentle sawing motion rather than pressing straight down. Each roll should be about 1 1/3 inches thick. Arrange the cut rolls in a greased 9 by 13 inch baking pan, spacing them about 1/2 inch apart. They will expand and touch during the second rise and baking.
- Second Rise:
- Cover the pan loosely with plastic wrap or a clean kitchen towel. Let the rolls rise in a warm spot for 30 to 45 minutes until they're puffy and have expanded to touch each other. They won't quite double in size like the first rise, but they should look noticeably larger and feel soft and airy when you gently press them. While the rolls complete their second rise, position a rack in the center of your oven and preheat it to 350 degrees Fahrenheit.
- Bake the Rolls:
- Once the rolls have finished rising and the oven is fully preheated, remove the cover from the pan. Place the pan on the center rack of the oven. Bake for 25 to 30 minutes until the rolls turn golden brown on top and the edges are set. The internal temperature should reach 190 degrees Fahrenheit when checked with an instant read thermometer inserted into the center of a middle roll. If the tops are browning too quickly but the centers aren't done, tent the pan loosely with aluminum foil for the last 5 to 10 minutes of baking. Remove from the oven and let cool in the pan for about 10 minutes before glazing.
- Make the Cream Cheese Glaze:
- While the rolls bake or cool, make the glaze. In a medium bowl, combine the softened cream cheese and softened butter. Use an electric hand mixer or a wooden spoon to beat them together until smooth and creamy with no lumps remaining, which takes about 2 minutes. Add the powdered sugar and the reserved 2 tablespoons of strawberry filling. Beat on low speed at first to prevent powdered sugar clouds, then increase to medium speed and beat for 1 to 2 minutes until completely smooth. Add 1 tablespoon of milk or cream and beat to combine. Check the consistency by lifting your spoon, the glaze should be thick but pourable. Add the additional tablespoon of milk or cream if needed to reach perfect drizzling consistency.
- Glaze and Serve:
- Pour or spoon the cream cheese glaze generously over the warm rolls while they're still in the pan. Use the back of a spoon to spread it around if needed, letting it pool between the rolls and drip down the sides. The warmth of the rolls will slightly melt the glaze, creating a beautiful glossy finish. Let the glazed rolls sit for about 5 minutes to let the glaze set slightly, then serve immediately while still warm. Use a spatula to lift individual rolls out of the pan, making sure to scoop up any extra glaze from the bottom.
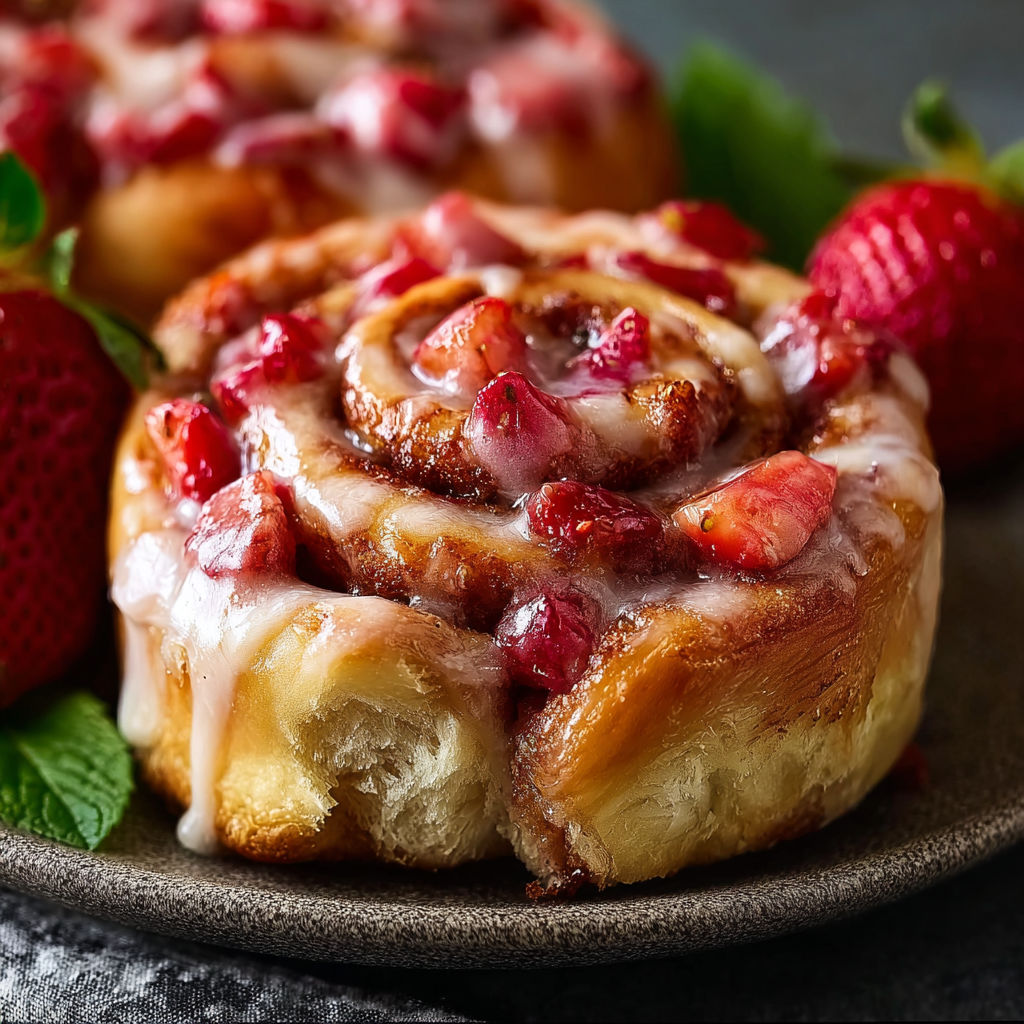
My absolute favorite part of this recipe is using the reserved strawberry filling in the glaze. This small detail makes such a difference because it creates a gorgeous pink color naturally without food coloring and intensifies the strawberry flavor throughout every bite. I discovered this trick by accident when I had leftover filling and didn't want to waste it. Now I always make sure to cook a little extra filling just so I have plenty for the glaze. My grandmother always said that the best recipes use every bit of an ingredient, and this technique honors that wisdom while creating something beautiful.
Flavor Boosters
All purpose flour can be substituted for bread flour for a softer roll, or use whole wheat flour for a nuttier result. Add an extra tablespoon of flour if swapping to all purpose. Mixed berries, rhubarb, or a hint of almond extract or orange zest transform the filling. A pinch of cardamom or nutmeg adds warm, complex notes. Swap half the cream cheese in the glaze for mascarpone, or add white chocolate chips to the filling for decadent variation. Drizzle with extra strawberry sauce or maple syrup for extra flavor depth.
Serving Suggestions
Strawberry cinnamon rolls shine as a brunch centerpiece or an elevated dessert. Serve them with crispy bacon or sausage, fresh fruit, and hot coffee or tea for breakfast. For a special brunch, arrange on a platter with strawberry slices and mint. Turn the rolls into dessert with vanilla ice cream or whipped cream, and drizzle extra sauce or chocolate. Dust with powdered sugar, warm the serving platter, and garnish with fresh fruit for bakery style appeal.
Creative Twists
Make mini strawberry cinnamon rolls in muffin tins for cute, portable portions and quick baking. In summer, swirl in blueberries for red white and blue rolls, or use apple cinnamon filling in fall. Freeze fresh strawberries during peak season so you can enjoy these rolls all winter. Double the recipe for parties, and try orange zest or blackberries for a seasonal surprise.

Strawberry cinnamon rolls bring together loved ones and turn every occasion into a memory. Don’t be surprised when these become your most requested breakfast treat!
Common Questions About This Recipe
- → How can I ensure my dough is soft and fluffy?
Warm the milk slightly and use bread flour for the dough. Allow proper kneading and rising time for the best texture.
- → Can I substitute frozen strawberries for fresh?
Yes, both fresh and frozen strawberries work well. Just be sure to thaw and drain frozen strawberries before using to prevent excess moisture.
- → What makes the cinnamon rolls richer?
Adding whole eggs and an extra yolk along with melted butter in the dough creates a richer, more tender crumb.
- → How do I prevent the filling from leaking out?
Thicken the strawberry filling with cornstarch and avoid overfilling the dough before rolling to keep everything intact during baking.
- → What’s the best way to make the glaze?
Blend softened cream cheese with butter, powdered sugar, a bit of reserved strawberry filling, and milk or cream for the desired consistency.