
 Pin
Pin
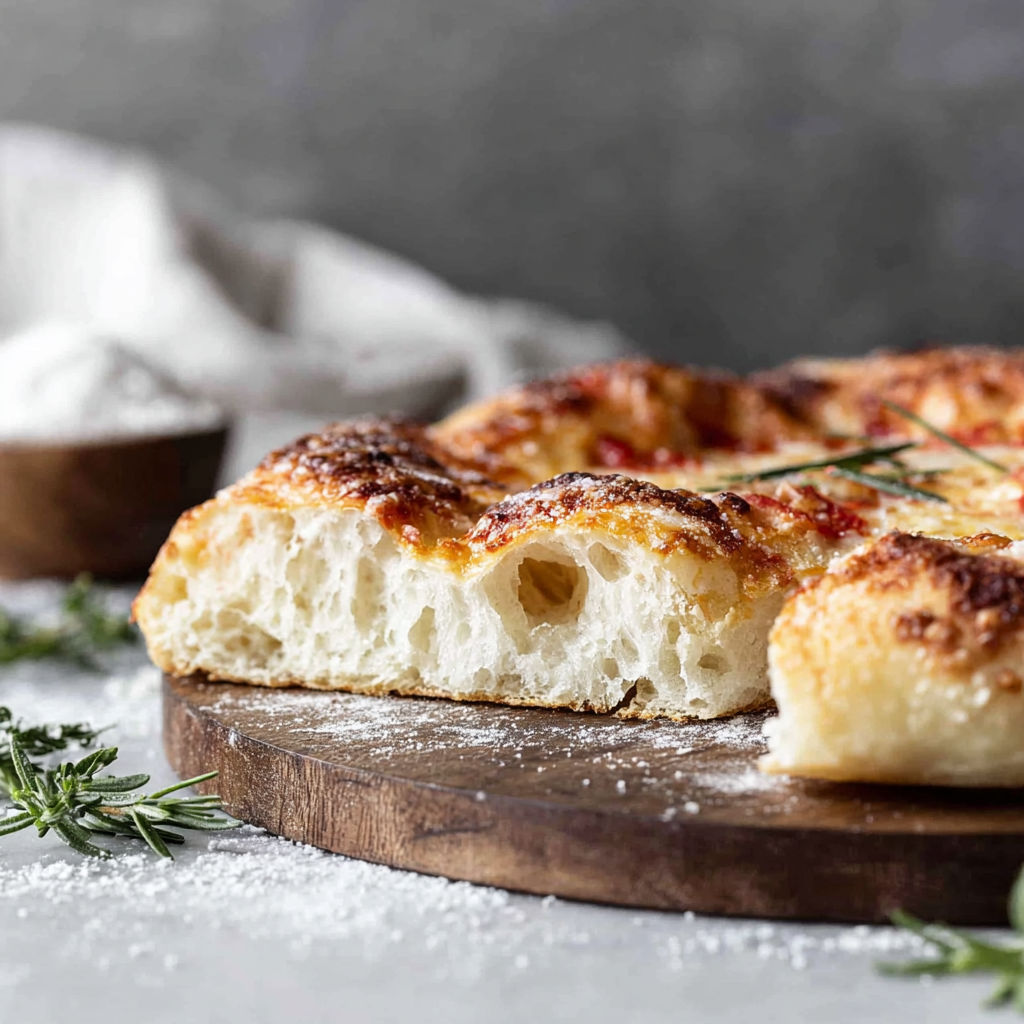
This artisan pizza dough recipe has transformed my Friday nights from takeout orders to family pizza parties where everyone gathers around the counter to top their own masterpiece. The method might seem unconventional with its minimal yeast and long fermentation, but that's exactly what creates those beautiful air pockets and complex flavor that rivals your favorite pizzeria. I stumbled upon this technique years ago when trying to replicate the pizza I had in Naples, and after countless batches, this formula became my go to for that perfect balance of crispy exterior and chewy interior with those signature leopard spotted bubbles across the crust.
I'll never forget the first time my daughter bit into a slice made with this dough and declared it better than our local pizza place. Now she invites friends over specifically for homemade pizza nights, and I love watching their faces when they see those gorgeous bubbles puffing up in the oven.
Gather Your Ingredients
- 500g all purpose flour which is about 3 3/4 cups plus 2 tablespoons: This forms the foundation of your dough and provides the gluten structure needed for that chewy texture. Look for unbleached flour with a protein content around 10 to 12 percent for the best results. I keep mine in an airtight container to maintain freshness.
- 375g warm water divided which equals 1 1/2 cups plus 2 tablespoons: The water should feel comfortably warm to the touch, around 90 to 100 degrees. This temperature activates the yeast without killing it. Using filtered water makes a noticeable difference in taste if your tap water is heavily chlorinated.
- 1g active dry yeast which is just 1/4 teaspoon: Yes, this tiny amount is intentional. The small quantity allows for slow fermentation which develops complex flavors. Make sure your yeast is fresh by checking the expiration date. Store it in the refrigerator after opening.
- 10g fine salt about 1 1/2 teaspoons: Salt strengthens the gluten network and enhances flavor. Fine sea salt or table salt dissolves easily into the dough. I prefer sea salt for its clean taste, but regular table salt works perfectly fine.
How to Make It
- Create the Initial Dough Mixture
- Pour all but one tablespoon of the warm water into a large mixing bowl. Add the flour directly to the water. Using your hand or a wooden spoon, mix the flour and water together until no dry flour remains visible in the bowl. The mixture will look shaggy and rough at this stage which is exactly what you want. Don't worry about it being smooth. Cover the bowl with a clean kitchen towel or plastic wrap and let it sit undisturbed on your counter for 20 minutes. This resting period is called autolyse and it allows the flour to fully hydrate and begin developing gluten without any work from you. While the dough rests, take that reserved tablespoon of warm water and pour it into a small cup. Sprinkle the yeast over the surface of the water and give it a gentle stir. Set this aside and let the yeast dissolve completely. You'll notice it might start to look slightly foamy which means your yeast is alive and ready to work.
- Incorporate the Salt and Yeast
- After the 20 minute rest, uncover your dough. Sprinkle the salt evenly over the entire surface of the dough. Give your yeast mixture one more stir to make sure everything is dissolved, then pour it over the dough as well. Now comes the fun part called folding. Wet your hand with a bit of water to prevent sticking. Slide your wet hand down the side of the bowl and underneath the dough. Grab a section of the dough from the bottom and stretch it upward until you feel gentle resistance, then fold it over the top center of the dough. Rotate your bowl about a quarter turn and repeat this process. Keep folding sections of dough from underneath and over the top until you've covered the center completely. Next, form your hand into a pincer shape using your thumb and fingers. Pinch off a chunk of dough about the size of a walnut, squeezing through it completely. Wet your hand again if needed. After pinching, fold the dough over itself a few times. Continue this pinching and folding action five to six times total. This technique helps distribute the salt and yeast throughout the dough. The dough will look rough and shaggy when you're done. Cover the bowl again and let it rest for about an hour at room temperature.
- Perform the Gluten Development Fold
- After an hour, your dough will have relaxed and spread out slightly in the bowl. Wet your hand again and slide it underneath the dough at one edge. Gently stretch that section of dough upward, pulling until you feel it resist, then fold it over the center of the dough mass. Rotate your bowl roughly 90 degrees and repeat this stretching and folding motion. Continue around the bowl four to five more times until the dough begins to tighten up and form into a ball shape. You'll feel the dough become more elastic and cohesive with each fold. This single round of folding develops the gluten structure that gives your pizza crust its wonderful chew. Now prepare a clean bowl by rubbing a small amount of olive oil or neutral oil around the inside. Take your entire ball of dough and flip it over into the greased bowl so the smooth top side is facing up and any seams are on the bottom. Cover the bowl with a towel or plastic wrap. Let the dough rise at room temperature until it has doubled in volume. This will take 5 to 6 hours depending on your room temperature. Warmer kitchens will speed this up while cooler rooms will slow it down. The long rise is crucial for flavor development so don't rush this step.
- Divide and Shape into Balls
- Once your dough has doubled, it's time to shape it into individual pizza balls. Sprinkle some flour generously over your work surface. Gently turn your bowl upside down and let the dough fall out onto the floured surface. The dough will deflate slightly which is normal. Using a bench scraper or sharp knife, cut the dough directly in half to create two equal pieces. Each piece will make one large pizza. Work with one piece at a time while keeping the other covered with a towel. Take your first piece and orient it so you can see it as having four sides like a square. Grab one edge and gently stretch it outward just until you feel the dough start to resist. Fold that stretched section back over the center of the dough. Rotate the dough and grab the next edge. Stretch and fold it over the center as well. Repeat this stretching and folding for the remaining two edges. You've now folded all four sides over the center creating a rough ball with the seams meeting in the middle. Flip the entire ball over so the seam side is down against the counter and the smooth side is facing up. Clear a small area on your counter that has no flour. Place the ball on this unfloured spot. Cup both of your hands around the sides of the dough ball. Gently pull the ball toward your body, dragging the bottom edge along the counter surface. This dragging creates tension on the surface of the dough. Rotate the ball 90 degrees and drag it toward you again for a few inches. Keep rotating and dragging until the top of the ball becomes taut and smooth and the ball is nicely rounded. This tension on the surface helps the dough hold its shape and rise properly.
- Final Rest and Preparation
- Lightly grease a large plate or small baking sheet with olive oil. Transfer your shaped ball to the greased surface. Repeat the entire shaping process with your second piece of dough. Once both balls are on the plate, drizzle or brush a small amount of olive oil over the top of each ball. This prevents them from drying out. Cover the plate loosely with plastic wrap or a damp towel. Let the dough balls rest at room temperature for about one hour. During this time, preheat your oven to its highest temperature, usually 500 to 550 degrees Fahrenheit. If you have a pizza stone or steel, place it in the oven on a middle or upper rack to preheat as well. After the hour rest, your dough is ready to stretch and top for baking. If you're not ready to make pizza right away, you can skip the room temperature rest and instead cover the plate tightly with plastic wrap. Refrigerate the dough balls for up to two days. The cold fermentation adds even more flavor. When you're ready to use refrigerated dough, remove it from the fridge and let it sit at room temperature for 30 to 45 minutes before stretching to take the chill off.
My absolute favorite thing about this dough is how the minimal yeast creates such a complex flavor profile. Traditional pizza dough recipes often use much more yeast and shorter rise times, but this method taught me that patience truly pays off. The first time I tried it, I was skeptical about using such a tiny amount of yeast, but when I tasted that first bite with its subtle tang and incredible texture, I understood why Neapolitan pizza makers have used similar techniques for generations. My family now refuses to eat pizza any other way, and I've lost count of how many friends have asked me for this recipe after tasting the results.
Flavor Boosters
While this recipe is beautifully simple, sometimes you need to work with what you have. Bread flour can replace all purpose flour and will create an even chewier crust with more structure due to its higher protein content. Use the same weight measurement. If you only have measuring cups, use slightly less bread flour as it's denser. I've made this dough countless times with bread flour when that's what I had on hand, and my family actually prefers the extra chew.
Instant yeast can substitute for active dry yeast at the same measurement. The difference is that instant yeast can be mixed directly into the flour without dissolving in water first. However, for this recipe, I still recommend dissolving it in that tablespoon of water to ensure even distribution throughout the dough.
If you want to experiment with whole wheat flour, start by replacing just 25 percent of the all purpose flour with whole wheat. This adds a nutty flavor and more nutrition. Whole wheat absorbs more water, so you may need to add an extra tablespoon or two of water to achieve the right consistency. Going beyond 50 percent whole wheat can make the crust dense and heavy.
Honey or sugar can be added at about one teaspoon per batch to boost browning if your oven doesn't get very hot.
Sea salt works beautifully but kosher salt can be used though you may need slightly more due to larger crystals.
For a richer dough some recipes add a tablespoon of olive oil but I love the pure simple flavor without it.
Serving Suggestions
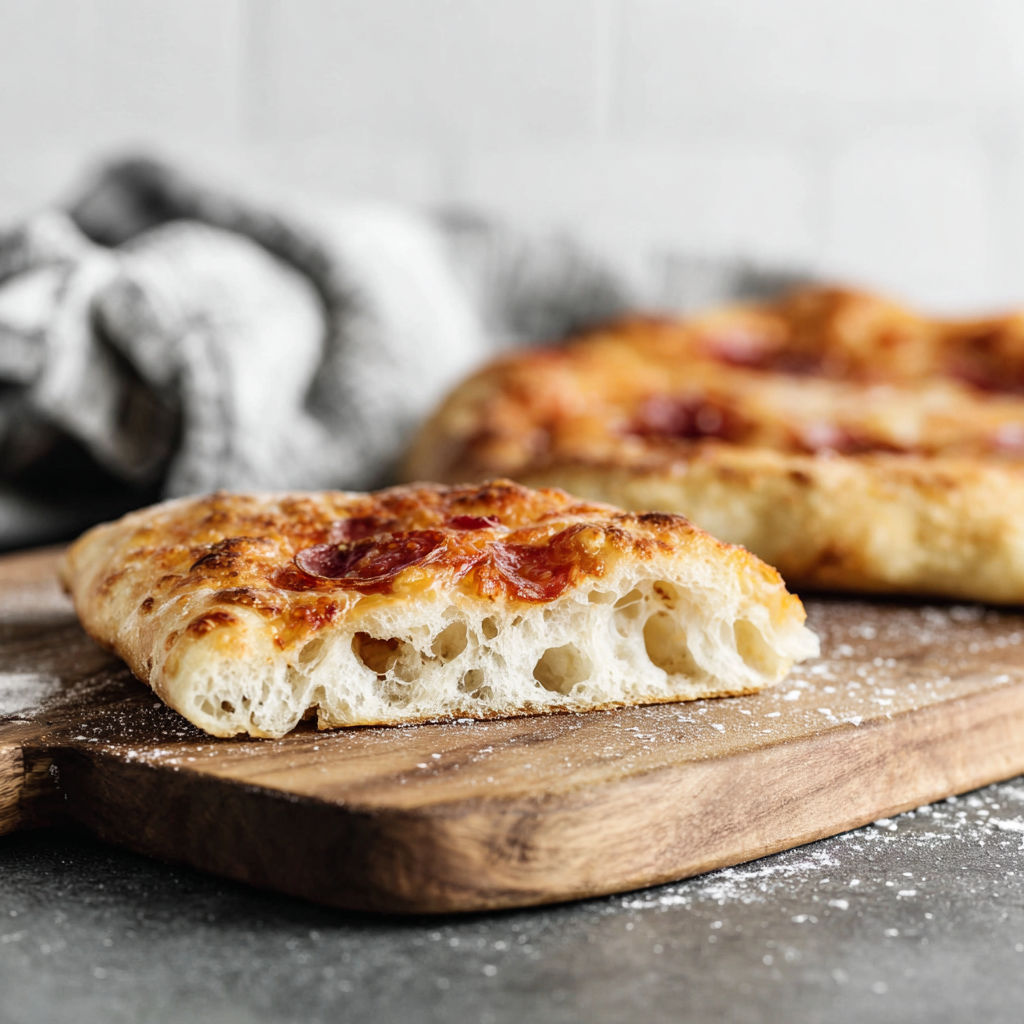
The way you handle the dough before baking makes all the difference between a thick bready crust and a thin crispy one with a puffy cornicione edge. Take your rested dough ball and place it on a well floured surface. Press down gently in the center with your fingertips, leaving about an inch around the edge untouched. This border becomes your crust. Continue pressing and gently stretching the center outward, always maintaining that thick outer rim.
Once you've pressed it into a small disk, you can lift the dough and let gravity help stretch it. Hold the edge with both hands and slowly rotate the dough, letting the weight of the dough pull it larger. Your hands should move around the edge like you're turning a steering wheel. If the dough resists and springs back, let it rest for five minutes. This allows the gluten to relax.
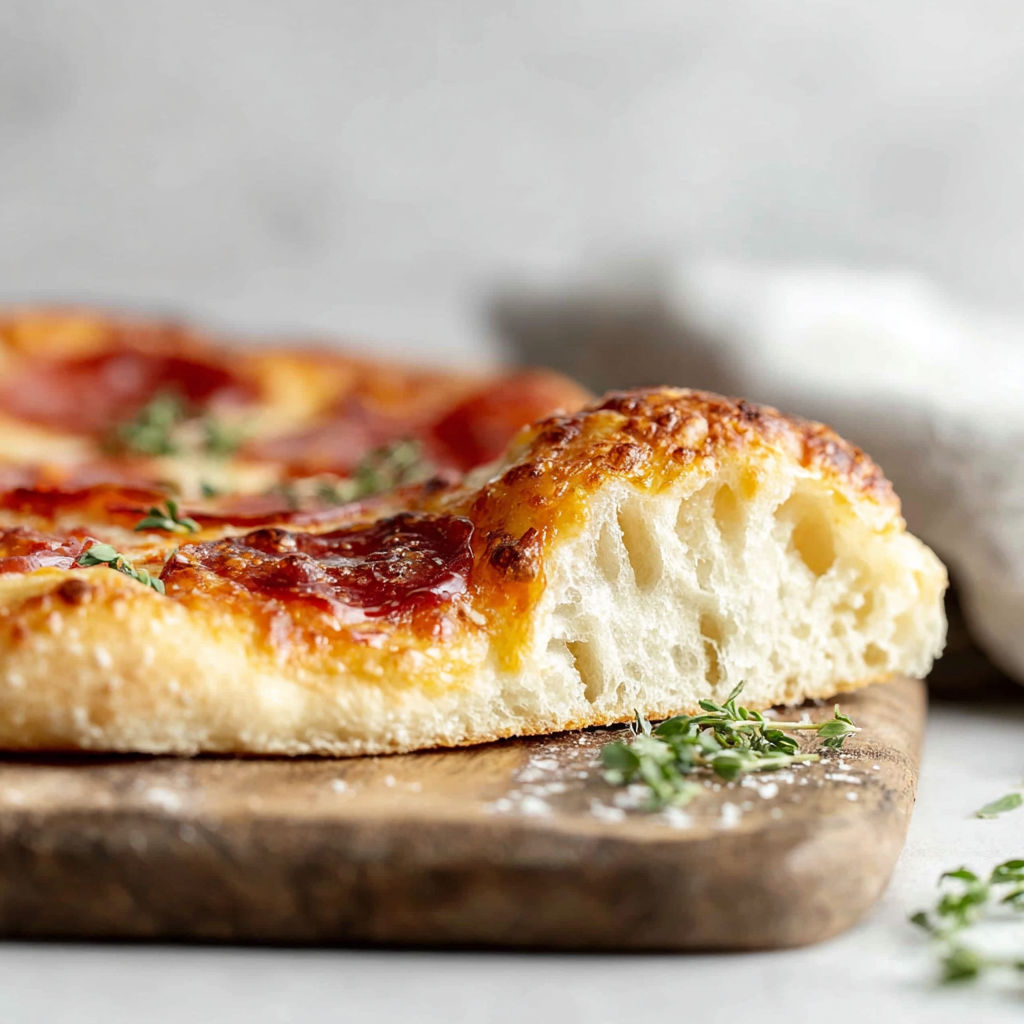
Never use a rolling pin on this dough. Rolling pins press out all those beautiful air bubbles you worked so hard to develop. Those bubbles are what create the signature leopard spotting and light texture. I learned this the hard way when I rushed one night and rolled out my dough. The resulting pizza was flat and dense without any of that artisan character.
Flour your surface generously to prevent sticking but brush off excess before adding toppings. Keep the edges thicker than the center for that authentic pizzeria style puffy crust. If you tear the dough simply pinch it back together and let it rest a moment.
Creative Twists
The hottest oven possible is your friend when making pizza. I preheat my oven to 550 degrees Fahrenheit for at least 45 minutes with my pizza steel on the upper rack. That long preheat ensures your baking surface is thoroughly heated and ready to create a crispy bottom crust. If you don't have a pizza steel or stone, flip a heavy baking sheet upside down and preheat that instead.
For the crispiest results, I assemble my pizza on a piece of parchment paper dusted with cornmeal or semolina flour. This lets me easily slide the pizza onto the hot steel. The parchment protects the bottom from burning while the high heat works its magic. After about three minutes, I carefully pull out the parchment from under the pizza and let it finish baking directly on the steel for maximum crispness.
An outdoor pizza oven reaches temperatures of 800 to 900 degrees and cooks pizza in just 90 seconds. If you have one, use it. The results are spectacular. I'm lucky enough to have a friend with a wood fired oven, and making pizza there is always an event. The intense heat creates those perfect charred bubbles and cooks the pizza so quickly that the toppings stay fresh and vibrant.
Bake on the top rack of your oven where heat is most intense for the best rise. Watch your pizza closely as it can go from perfect to burnt quickly at high temperatures. Rotate the pizza halfway through baking if your oven has hot spots for even cooking.
Having a stash of these dough balls in the fridge or freezer means delicious, artisan pizza is always within reach. Patience, not effort, is the real secret to better pizza. Enjoy every bubbly, chewy bite!
Common Questions About This Recipe
- → What flour is best for artisan pizza dough?
Use high-quality all-purpose flour or bread flour for a balance of chewy texture and crisp crust. Both absorb water well and help develop gluten.
- → How long should the dough rise?
This dough needs 5-6 hours to double in volume for best texture. A long rise lets flavors develop and results in airy bubbles.
- → Can I store the dough for later use?
Yes, tightly wrap and refrigerate the dough for up to 2 days. Bring it to room temperature before baking for even rise.
- → What is the benefit of folding the dough?
Folding develops gluten structure, giving the crust its signature chew and consistent airy bubbles throughout.
- → Do I need a pizza stone for baking?
A pizza stone or steel helps produce a crisp bottom, but a preheated baking sheet can also work for excellent results.
- → Is this dough suitable for thin or thick crust?
This versatile dough works for both styles. For thin crust, stretch it thinner before baking; for thicker, leave the edges puffier.