
 Pin
Pin
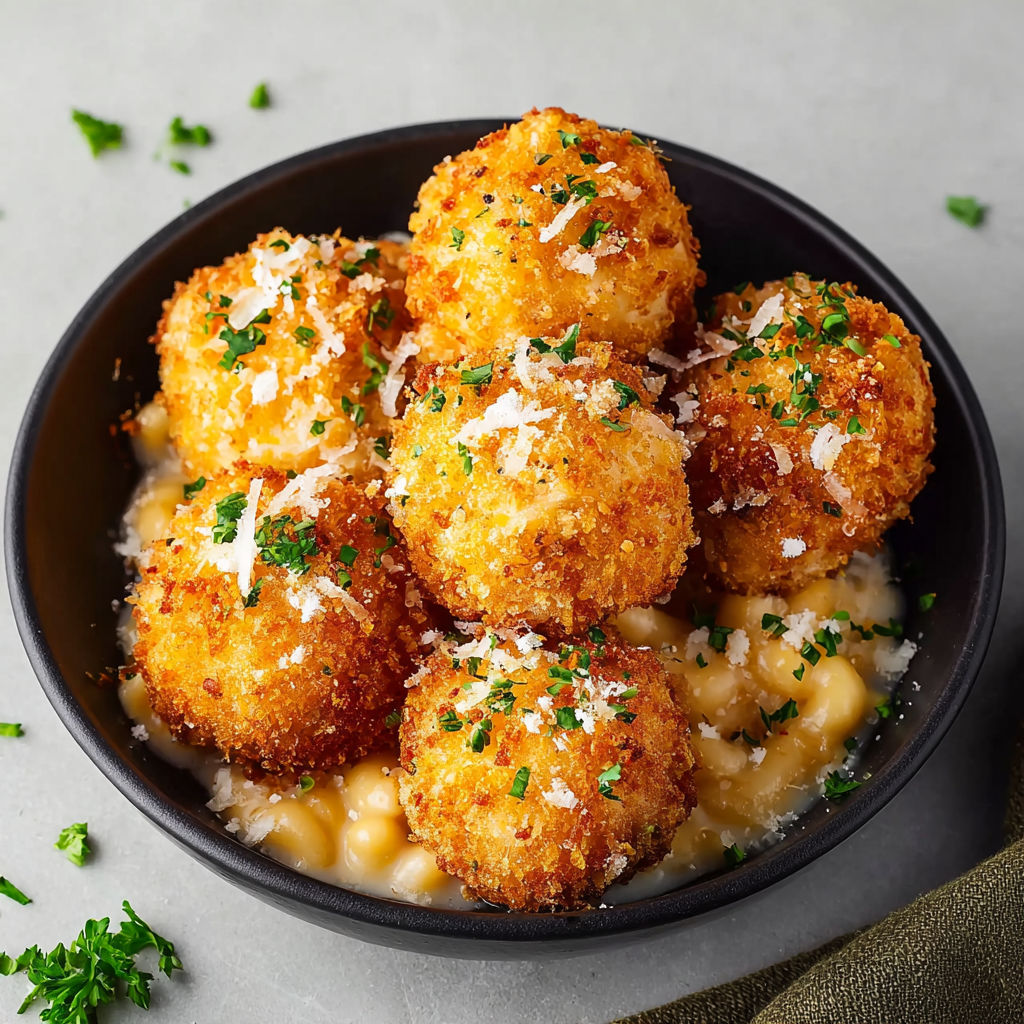
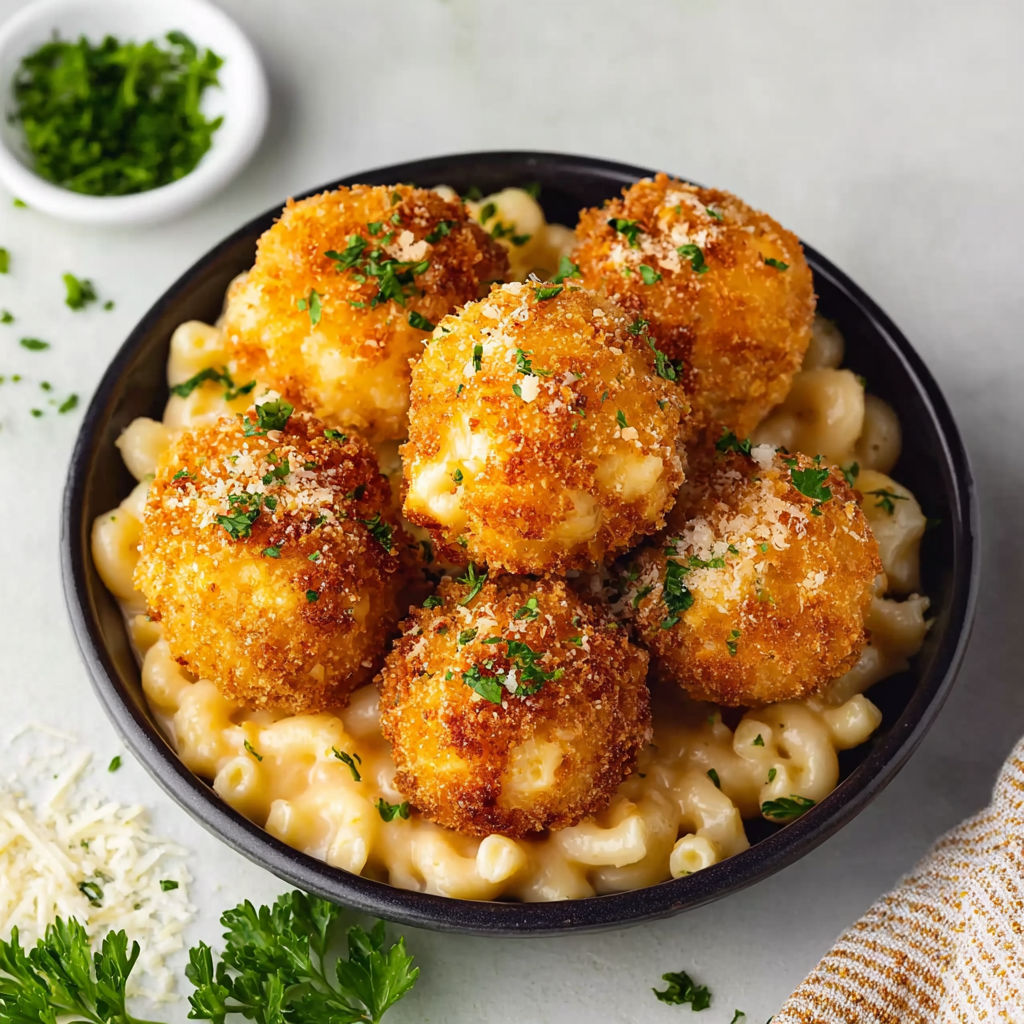
These crispy air fryer macaroni and cheese balls bring the magic of Cheesecake Factory appetizers straight to your kitchen without the deep fryer mess. The creamy, gooey center surrounded by a perfectly golden crust makes these little bites absolutely irresistible at parties or as a special weeknight treat for the family.
I discovered this recipe when trying to recreate our favorite restaurant starter at home, and honestly, my family thinks these taste even better than the original. The air fryer gives them such a beautiful golden exterior while keeping the inside wonderfully creamy, and now they've become our go to appetizer for every gathering.
Gather Your Ingredients
- 1 cup elbow macaroni: The small size is essential for creating balls that hold together well. Look for quality durum wheat pasta for the best texture.
- 2 tablespoons butter: Creates the base for a smooth roux. European style butter adds extra richness if you have it.
- 2 tablespoons all purpose flour: Thickens the cheese sauce to the perfect consistency for shaping. Make sure it's fresh for best results.
- 1 1/4 cups milk: Whole milk gives the creamiest sauce, though 2% works in a pinch. Avoid skim as the sauce won't be rich enough.
- 1/2 teaspoon garlic powder: Adds savory depth without overpowering the cheese. Fresh garlic can burn during air frying, so powder is best here.
- 1/2 teaspoon onion powder: Brings subtle sweetness and complexity to the cheese mixture.
- 1/2 teaspoon salt: Enhances all the flavors. Adjust based on how salty your cheeses are.
- 1/4 teaspoon black pepper: Freshly ground gives the best flavor and a slight kick.
- 1 1/2 cups shredded mozzarella cheese: Provides that amazing stretchy, melty quality. Shred from a block rather than buying pre shredded for better melting.
- 1/2 cup grated Parmesan cheese: Adds sharp, nutty flavor that balances the mild mozzarella. Authentic Parmigiano Reggiano makes a noticeable difference.
- 1 large egg: Acts as the glue to help the breading stick. Room temperature egg works better than cold.
- 1/2 cup bread crumbs: Regular Italian style bread crumbs provide the base coating.
- 1/2 cup panko bread crumbs: Creates that extra crispy, light texture. Japanese panko is coarser and crunchier than regular breadcrumbs.
- 1/4 cup all purpose flour: Helps the egg adhere to the sticky cheese balls.
- Vegetable oil for spraying: Essential for getting that fried golden color and crispy texture in the air fryer.
How to Make It
- Melt the Butter Foundation:
- Place your medium saucepan on the stovetop over medium heat and add the 2 tablespoons of butter. Let it melt completely until it begins to gently bubble and foam but doesn't brown. This should take about 1 minute. The butter needs to be fully melted and hot to properly incorporate with the flour in the next step.
- Create the Roux Base:
- Sprinkle the 2 tablespoons of all purpose flour directly over the melted butter. Immediately begin whisking in a steady circular motion, making sure to reach all edges of the pan. Continue whisking constantly for 1 to 2 minutes until the mixture becomes paste like and turns a very light golden color. You'll notice it smells slightly nutty. This cooking process removes the raw flour taste and creates the thickening base for your sauce.
- Build the Creamy Sauce:
- Very slowly pour the 1 1/4 cups of milk into the roux while whisking vigorously. Start with just a small drizzle, whisking constantly until smooth, then gradually increase the pour. This slow incorporation prevents lumps from forming. The mixture will go from thick paste to smooth liquid as you add more milk. Keep whisking until every bit is combined and silky smooth.
- Season with Aromatic Spices:
- Add the garlic powder, onion powder, salt, and black pepper directly into the milk mixture. Whisk everything together thoroughly so the seasonings distribute evenly throughout the sauce. You should see tiny flecks of the spices dispersed in the white sauce. Continue whisking for another 30 seconds to fully incorporate.
- Thicken to Perfection:
- Let the seasoned milk mixture come to a gentle simmer, stirring frequently with your whisk. You'll see small bubbles beginning to break the surface. Maintain this gentle simmer for 3 to 4 minutes, whisking every 30 seconds or so. The sauce will gradually thicken and should coat the back of your spoon when ready. It should have the consistency of thin gravy at this point.
- Melt in the Cheeses:
- Remove the saucepan from the heat source completely. Add the 1 1/2 cups of shredded mozzarella cheese and 1/2 cup of grated Parmesan cheese all at once. Stir continuously with a wooden spoon or silicone spatula, making sure to scrape the bottom of the pan. The residual heat will melt the cheeses beautifully. Keep stirring until the cheese is completely melted and the sauce is glossy and smooth with no visible cheese shreds remaining. This takes about 2 minutes of steady stirring.
- Combine with Cooked Pasta:
- Add your previously cooked and drained elbow macaroni to the cheese sauce. Use your spoon to fold and stir the pasta through the sauce, making sure every piece of macaroni is completely coated with the creamy cheese mixture. The pasta should be generously covered and the mixture should look thick and cohesive, not soupy. If it seems too loose, that's okay as it will firm up during cooling.
- Cool the Mixture Properly:
- Transfer the cheesy macaroni mixture to a shallow dish or spread it on a baking sheet to speed up cooling. Let it sit at room temperature for about 15 to 20 minutes, stirring occasionally. The mixture needs to cool enough to handle and firm up considerably. You can also refrigerate it for 10 minutes if you're in a hurry. The mixture is ready when it holds together when pressed and is cool to the touch.
- Shape into Uniform Balls:
- Once cooled and firm, use your hands or a cookie scoop to portion out the macaroni mixture into equal sized portions, about 2 tablespoons each. Roll each portion between your palms to form smooth, compact balls about 1 1/2 inches in diameter. Press firmly as you roll so the balls hold together tightly with no cracks. Place each formed ball onto a parchment lined baking sheet or large plate, spacing them so they don't touch.
- Prepare the Egg Wash Station:
- Crack the large egg into a shallow dish or bowl. Use a fork to whisk it thoroughly until the yolk and white are completely combined and the mixture is uniform in color with no streaks. Beat it well for about 30 seconds until slightly frothy. This helps the breadcrumbs adhere better.
- Set Up Breadcrumb Coating:
- In a separate shallow dish, pour in the 1/2 cup of regular bread crumbs and 1/2 cup of panko bread crumbs. Use a fork to mix them together thoroughly, combining the fine and coarse textures. This double breadcrumb technique creates the ultimate crispy coating with both density and crunch.
- Coat Each Ball Thoroughly:
- Set up your breading station with flour in one dish, beaten egg in another, and the breadcrumb mixture in a third. Take one macaroni ball and roll it first in the flour, shaking off excess. Next, dip it in the beaten egg, turning to coat all sides and letting excess drip off. Finally, roll it in the breadcrumb mixture, pressing gently so the crumbs adhere all over. Make sure there are no bare spots. The coating should be even and complete. Repeat with all remaining balls.
- Return to Chilling Station:
- Place each fully breaded macaroni ball back onto the parchment lined baking sheet. Make sure they're not touching each other. At this point, you can refrigerate them for 15 to 30 minutes to help the coating set, which prevents it from falling off during cooking. This chilling step is optional but highly recommended for the best results.
- Apply Oil for Crisping:
- Hold your vegetable oil spray about 6 inches above the breaded balls and give each one a light, even spray. Rotate each ball and spray again to ensure all surfaces get a light coating of oil. This oil is crucial for achieving that golden brown, crispy exterior that mimics deep frying. Don't oversaturate, just a light mist on all sides.
- Preheat Your Air Fryer:
- Set your air fryer to 375 degrees Fahrenheit or 190 degrees Celsius. Let it preheat for 3 to 5 minutes until it reaches temperature. Preheating ensures even cooking from the moment you add the food and helps achieve that perfect crispy exterior.
- Arrange for Even Cooking:
- Carefully place the breaded macaroni balls in the air fryer basket in a single layer. Leave at least half an inch of space between each ball so hot air can circulate all around them. Depending on your air fryer size, you may need to cook in batches. Don't overcrowd or they won't crisp up properly and may stick together.
- Air Fry to Golden Perfection:
- Cook the macaroni balls for 8 to 10 minutes total. Set a timer for 4 to 5 minutes, then carefully open the air fryer and use tongs to gently flip each ball over. This ensures even browning on all sides. Continue cooking for another 4 to 5 minutes until they're deep golden brown and crispy all over. The outside should be crunchy when tapped with tongs.
- Serve Hot and Fresh:
- Remove the finished macaroni and cheese balls from the air fryer basket immediately using tongs or a spatula. Let them rest for just 1 to 2 minutes to allow the filling to set slightly, which prevents burning your mouth on molten cheese. Serve them hot with your favorite dipping sauces like marinara, ranch, spicy mayo, or garlic aioli. They're best enjoyed within 10 minutes of cooking while still crispy outside and gooey inside.
The mozzarella cheese is truly the star here, and I've learned that buying a block and shredding it yourself makes all the difference. Pre shredded cheese has anti caking agents that prevent that gorgeous creamy melt we're after. I'll never forget the first time I made these for my son's birthday party. The kids literally lined up asking if there were more, and even the pickiest eaters who claimed they didn't like mac and cheese were sneaking seconds. That moment convinced me that everything really does taste better in ball form.
Flavor Boosters
These macaroni and cheese balls store exceptionally well, making them perfect for advance preparation. Once fully cooked and cooled, place them in an airtight container with parchment paper between layers to prevent sticking. They'll keep in the refrigerator for up to 4 days. To reheat, pop them back in the air fryer at 350 degrees for about 5 minutes until heated through and crispy again. Microwaving works for reheating but you'll lose that crispy exterior texture.
For longer storage, freeze the balls either before or after cooking. If freezing before cooking, bread them completely, place on a baking sheet, and freeze until solid, then transfer to freezer bags. They'll keep for 3 months. Cook from frozen by adding 3 to 4 extra minutes to the air frying time. If freezing after cooking, let them cool completely, freeze on a baking sheet, then bag them up. Reheat from frozen at 375 degrees for 8 to 10 minutes.
The mac and cheese mixture itself can be made up to 2 days ahead and kept refrigerated before shaping and breading. This actually makes the balls easier to form since the mixture is thoroughly chilled and firm.
The beauty of this recipe is its flexibility for different dietary needs and preferences. For a gluten free version, use gluten free pasta, gluten free flour blend, and gluten free breadcrumbs or crushed gluten free crackers. The texture turns out remarkably similar. If you can't find panko, use all regular breadcrumbs, though the coating won't be quite as light and crispy.
Cheese substitutions open up lots of possibilities. Sharp cheddar can replace some or all of the mozzarella for a more intense flavor, though you'll lose some of that stretchy quality. Gruyere adds sophisticated nuttiness. Pepper jack brings welcome heat. Just make sure whatever cheese you use melts well. Avoid pre crumbled cheeses like feta or cotija as they won't create that creamy sauce.
For a richer sauce, substitute half and half or even heavy cream for the milk. For dairy free, use plant based butter, oat or cashew milk, and dairy free cheese shreds, though the texture will be slightly different. Adding a tablespoon of nutritional yeast boosts the cheesy flavor in dairy free versions.
Serving Suggestions
These versatile bites work as appetizers, side dishes, or even a fun main course. At parties, arrange them on a platter surrounding small bowls of different dipping sauces. Marinara is classic, but try ranch dressing, honey mustard, buffalo sauce, garlic aioli, or spicy sriracha mayo for variety. Set out toothpicks for easy grabbing.
As a main dish, serve 4 to 5 balls per person alongside a crisp green salad with vinaigrette to cut the richness. Roasted vegetables like broccoli or Brussels sprouts make excellent accompaniments. For kids, pair them with carrot sticks, apple slices, and a small cup of ketchup for dipping.
They're also fantastic on game day spreads, potluck tables, or holiday appetizer spreads. Serve them in a lined basket to keep them warm, or use a warming tray. For elegant entertaining, skewer each ball with a decorative pick and arrange them standing up on a serving board.
Sweet and tangy sauces complement the rich cheese beautifully. A light, acidic side salad balances the heaviness perfectly. Room temperature dipping sauces work better than cold ones straight from the fridge.
Creative Twists
Home cooks everywhere have fallen in love with this recipe and made it their own. One reader shared that she adds crumbled bacon to the mac and cheese mixture before forming balls, creating a smoky, savory twist her family requests constantly. Another cook reported success making mini versions using just 1 tablespoon of mixture per ball, perfect for toddler sized portions or elegant party bites that yielded about 30 pieces.
A busy mom wrote that she now makes double batches every month, freezing half for quick after school snacks her kids can air fry themselves. Several people mentioned these saved their game day parties when they needed impressive food that wasn't complicated. One creative cook even used leftover mac and cheese from another meal, skipping the sauce making steps entirely and jumping straight to forming and breading.
The most common success tip shared is to make sure the mixture is cold enough before shaping. Rushing this step leads to balls that fall apart. Taking time to chill properly makes all the difference between frustrating and flawless results.
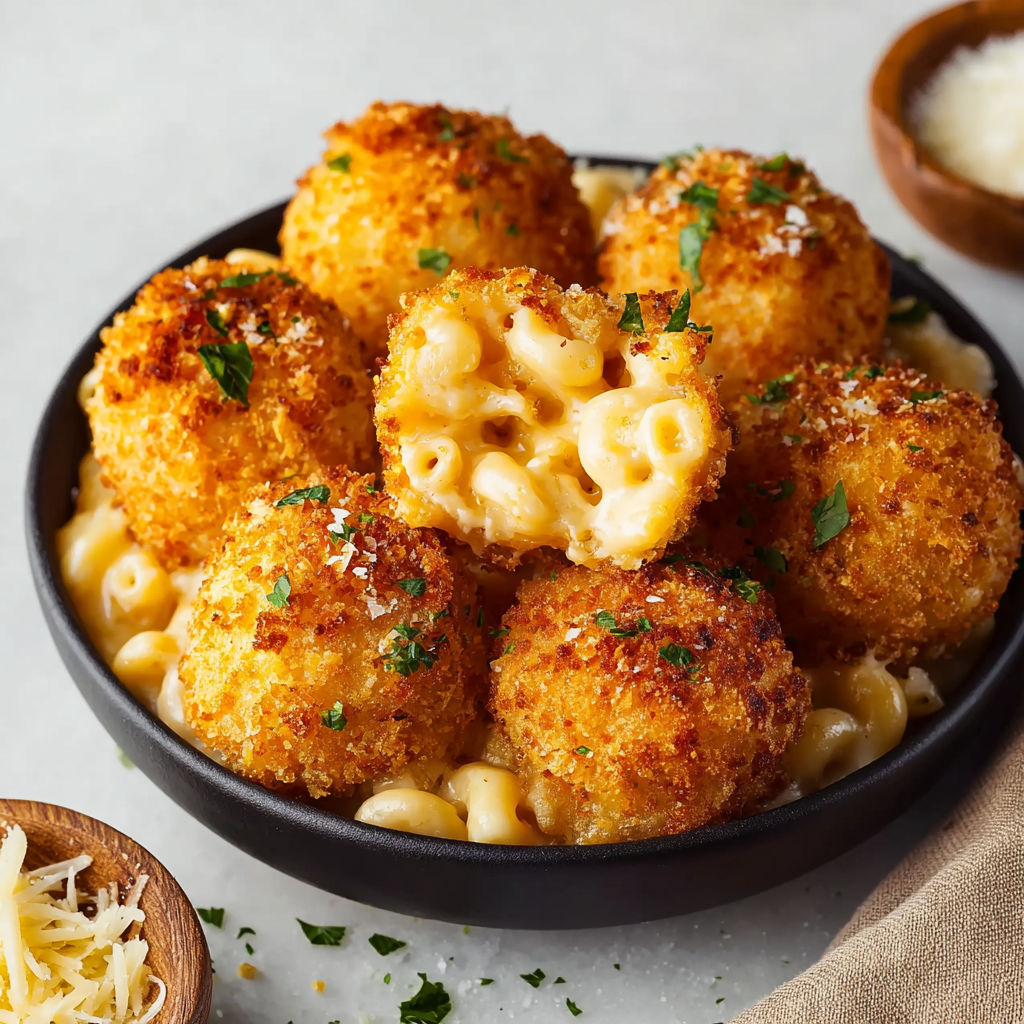
Crispy outside and gooey inside, these air fryer macaroni and cheese balls are the ultimate party treat. Make extra — they disappear fast!
Common Questions About This Recipe
- → How do you keep macaroni and cheese balls from falling apart during frying?
Let the macaroni mixture cool thoroughly before shaping and breading. Chilling helps the balls hold their shape inside the air fryer.
- → Can you prepare macaroni and cheese balls in advance?
Yes, you can form and bread the balls ahead, then refrigerate for several hours before air frying. This makes prep for parties easier.
- → What dipping sauces go well with fried macaroni and cheese balls?
Popular options include marinara, ranch, sriracha-mayo, or honey mustard. Choose based on your flavor preference.
- → How do you get the outside extra crispy in an air fryer?
Lightly spray the breaded balls with vegetable oil before cooking. Panko also helps achieve a crunchy texture.
- → Can other types of cheese be used?
You can experiment with cheddar, Gouda, or provolone for different flavors, adjusting amounts to maintain creamy texture.